User Guide
Home Screen
The home screen is where you get a preview of your child's device.

- The name of your child.
-
A thumbnail preview of what is happening on your child's device. If you don't see a
thumbnail, you will see a message of the device's current status:
- It appears that your child's device is currently offline.
If your child's laptop has not updated it's status in the last five minutes, this message will appear. Possible causes could be that the device is turned off, internet is disconnected, or your child has signed out of their account. - An icon depicting a circular arrow
This means the image is in the process of downloading.
You can tap on the thumbnail image (or message text) to navigate to the detail screen, where you can get a higher resolution image and zoom in on it.
NOTE: Please be aware that the image updates are not real time. Depending on your current internet connection there is on average about an 8-9 second lag between image updates.
- It appears that your child's device is currently offline.
- A timestamp of when the thumbnail was last updated.
- Go to the web filtering screen.
- Go to the screen recording screen.
- Go to the screen lock screen.
- Clear any active screen lock and web filters.
If you navigate to AND apply either a web filter, screen recording, or screen lock from the home screen, the actions will be applied to all of your children's devices. If you want to apply an action to only a single child, tap on the thumbnail to navigate to the detail screen, and navigate to the desired action and apply.
Detail Screen
The detail screen is where you can get a higher resolution image of what is happening on your child's laptop. You can also pinch-zoom on the image to get more details.
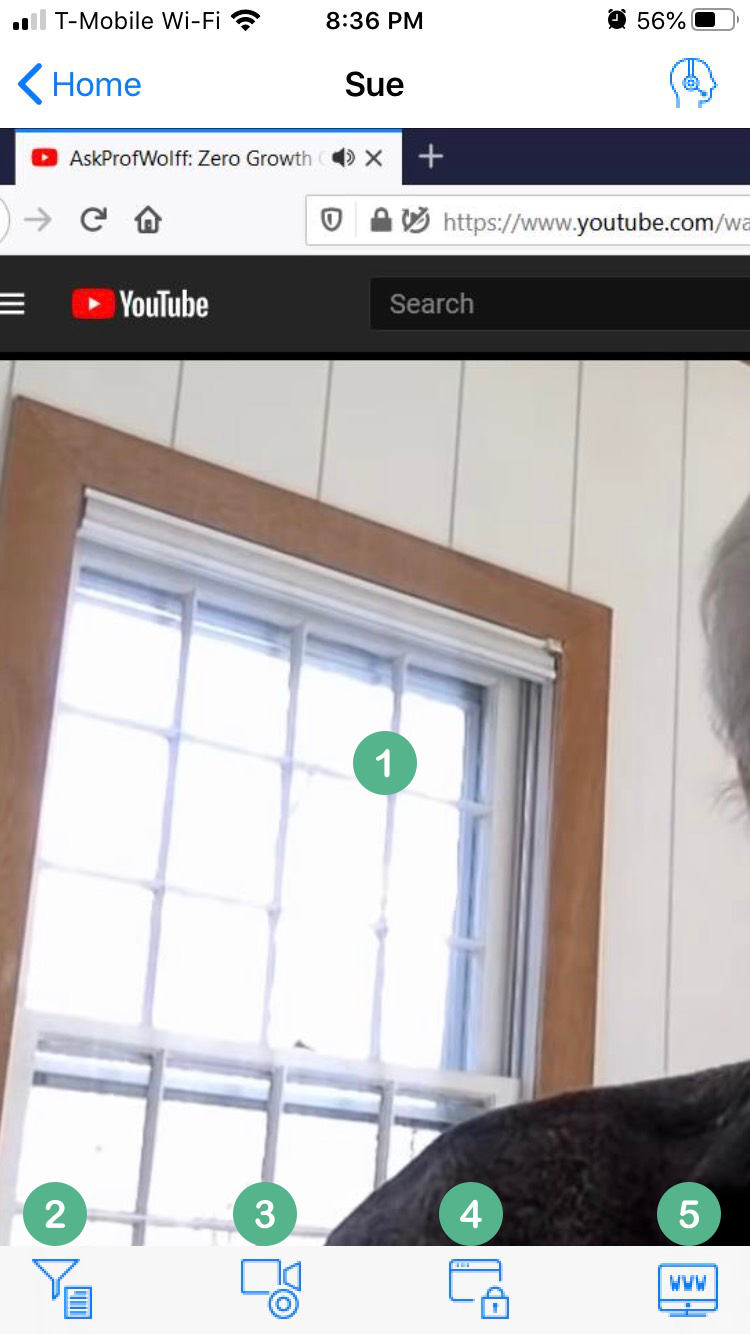
- An constantly updating, high-resolution image of your child's laptop. You can pinch-zoom
to zoom in/out on the image.
NOTE: Please be aware that the image updates are not real time. Depending on your current internet connection there is on average about an 8-9 second lag between image updates.
- Go to the web filtering screen.
- Go to the screen recording screen.
- Go to the screen lock screen.
- Go to the web history screen.
If you navigate to AND apply either a web filter, screen recording, or screen lock from the detail screen, the actions will be applied to only the child that you selected on navigation to the detail screen.
Web Filtering
The web filter screen is where you can block websites on your child's school-issued device.
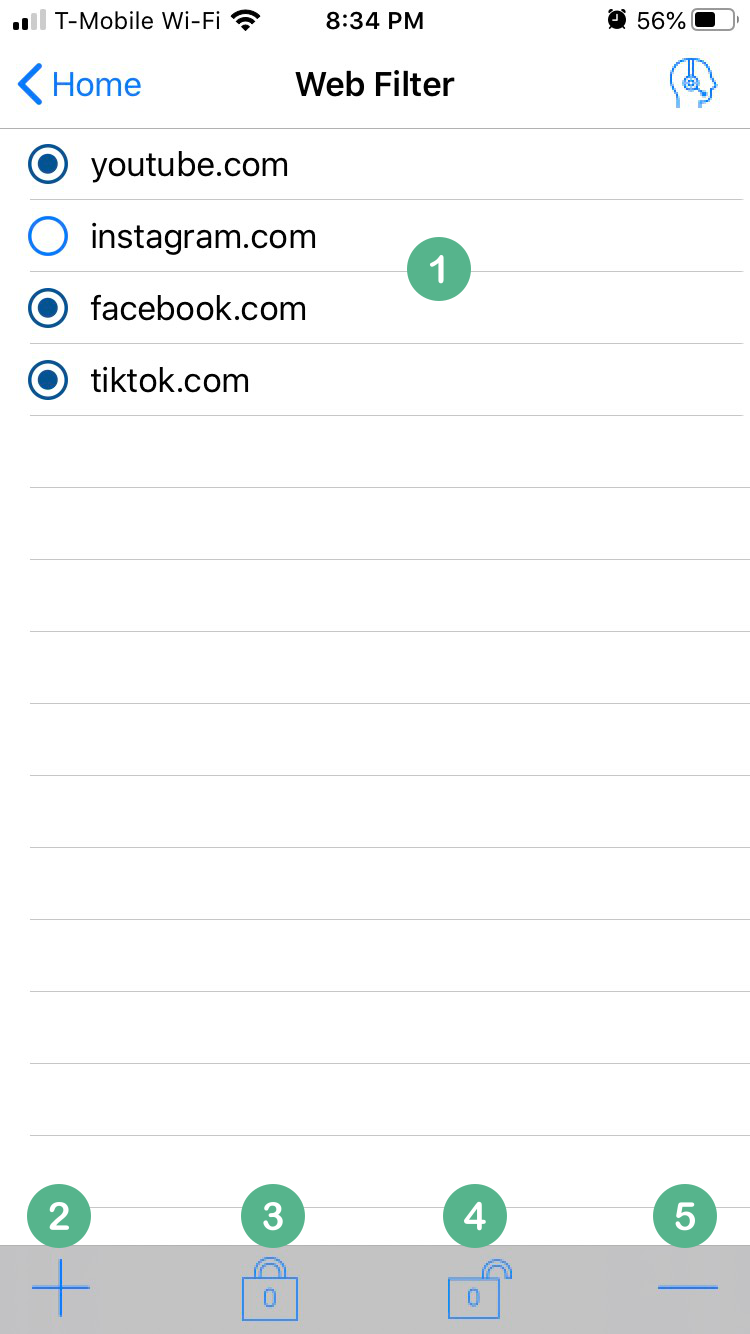
- A list of web sites. Select the radio button (hollow circle) to select one or more sites that you want to block or delete.
- Add a website to the list.
-
Block the websites that have been selected from the list.
NOTE: Anytime you apply a filter, any previous filters you have applied will be cleared. E.g. if you filter facebook.com, then later decide you want to also filter youtube.com, then when you come back to this screen you must re-select BOTH facebook.com and youtube.com and apply the filter action.
- Clear all blocked websites.
- Delete selected websites.
When is a web filter cleared?
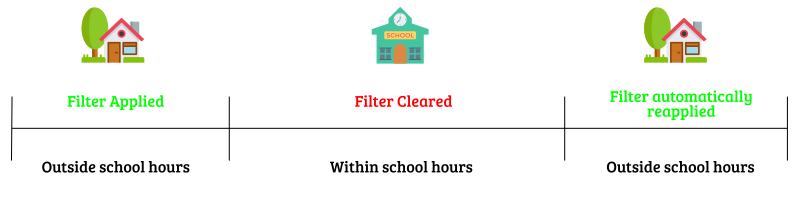
If you apply a web filter outside of school hours without clearing it before school starts, that filter will be cleared when school hours have started. When school hours end, the web filter will be automatically re-applied for you if you have the app open or once you sign-in.
Screen Recording
The screen recordings screen is where you can start a recording of activity on your child's device. The video that is formed at the end of a recording is a collection of thumbnails over a time range.
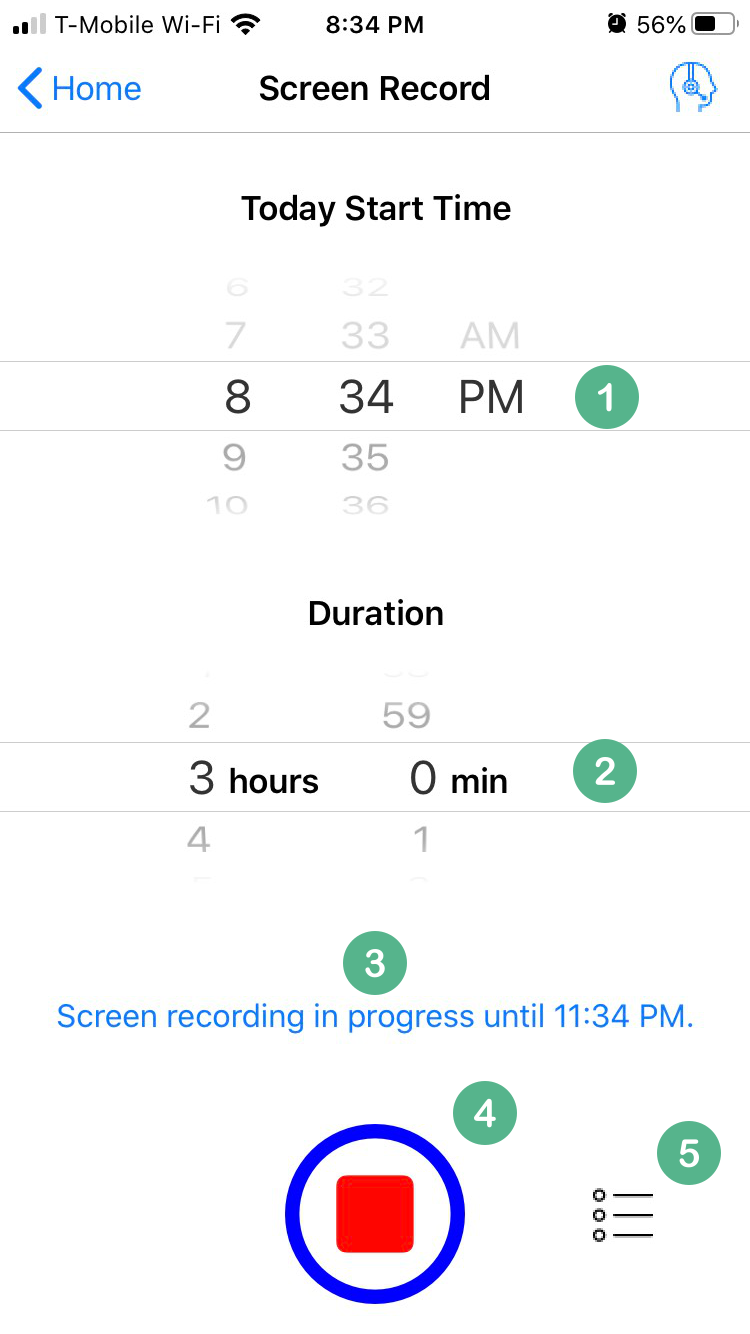
- Start a recording at the current time or ahead in the future. A "day" begins at 12 A.M. and recordings can only be made up to 24 hours. E.g. if you start a recording at 4 PM the max amount you can record is up to 3:59 PM the next day.
- Set a recording duration.
- A status message showing if any recording is in progress, or when the next recording session will begin.
- Record/Stop Recording button.
- Navigate to your list of recordings.
- Start a recording at the current time or ahead in the future. A "day" begins at 12 A.M. and recordings can only be made up to 24 hours. E.g. if you start a recording at 4 PM the max amount you can record is up to 3:59 PM the next day.
- Set an end time.
- A status message showing if any recording is in progress, or when the next recording session will begin.
- Record/Stop Recording button.
- Navigate to your list of recordings.
How does recording work?
When a recording is in progress, and your child is using their device, the recording will take a snapshot of their desktop every minute. That means if you set a recording to last for 60 minutes, the video file that is produced at the end of the recording will be one-minute long.
Anytime a recording is started it will be recorded as one video as long as your child does not sign-out of their account or shut down their device. If your child starts and signs back in to their device AND a recording is still in progress, then the current recording will be split into two video files.
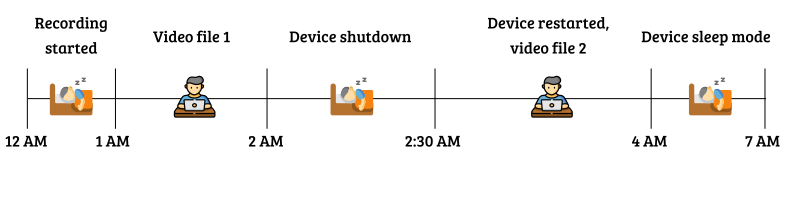
For example, you start a recording at 12 AM to 7 AM. Your child sleeps from 12 AM TO 1 AM and their laptop is shut-down, so during that time nothing is recorded. From 1 AM to 2 AM, your child wakes up and instead of falling back asleep, decides to browse the web from 1 AM to 2 AM. During this time all activity on the laptop is recorded. At 2 AM they hear a noise thinking its you heading to their room, so he quickly shuts down the laptop and runs into bed for 30 minutes. Since the device is shut-down, no activity is recorded. At 2:30 AM, he decides to resume his web browsing, starting up and signing into his device. Since he shut down last time and recording is still in progress until 7 AM, a new video file records activity until 4 AM, when he decides to finally go to sleep. Your child puts the laptop into sleep mode until 7 AM which means no activity will be recorded.
Screen Lock
The screen lock screen is where you can create your own messages that appear when locking down your child's device.
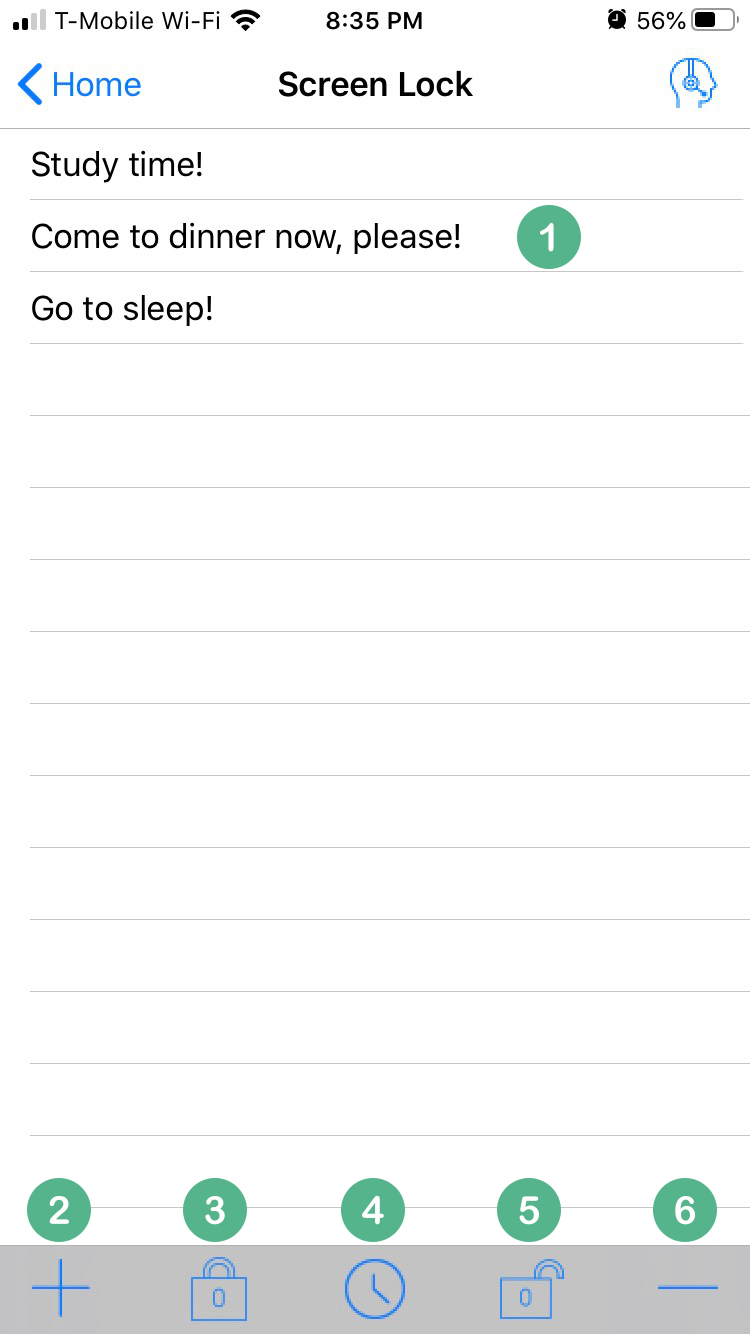
- List of screen lock messages.
- Add a screen lock message.
- Select a message and tap the lock icon to lock down your child's device.
- Navigate to the screen lock scheduling screen.
- Clears any locked screen.
- Remove a screen lock message.
Screen Lock Scheduling
The screen lock scheduling screen is where you can set a screen lock to be active during a time range.
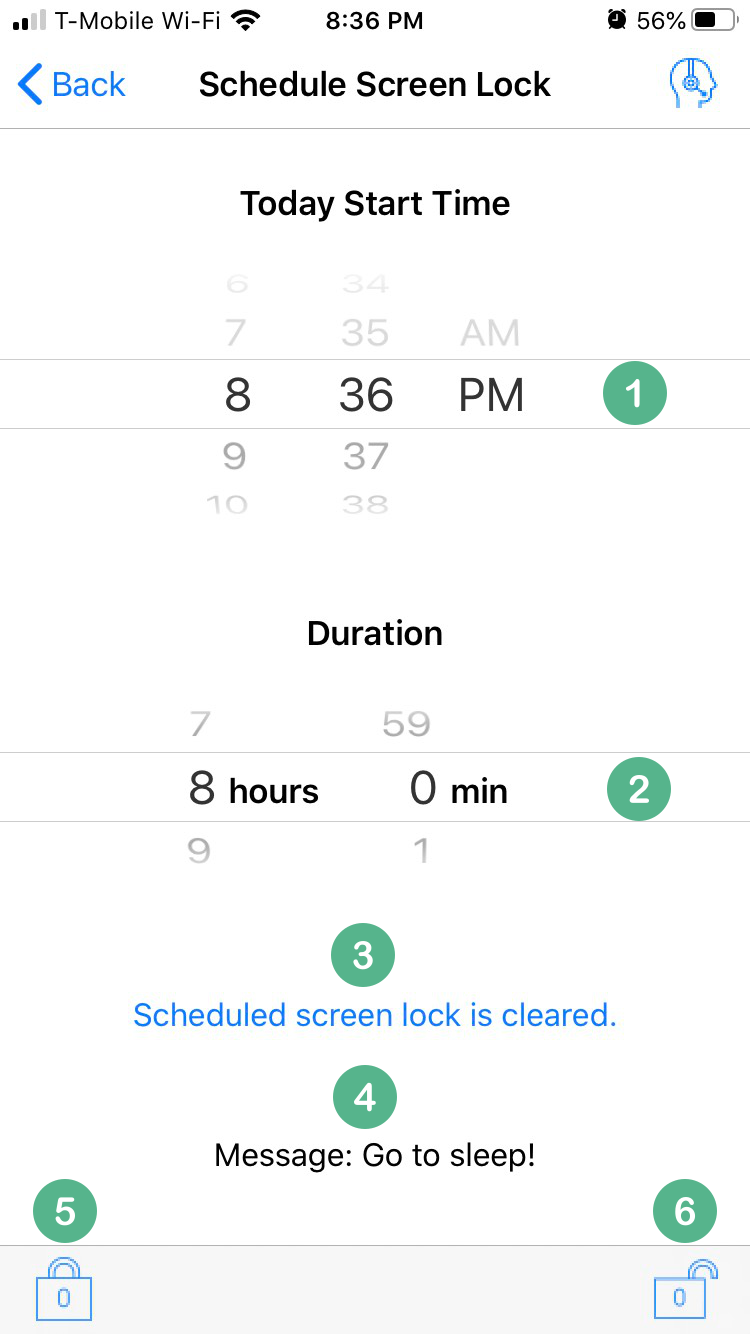
- Start a screen lock now or ahead in the future.
- Set the duration of the screen lock.
- Status message showing any scheduled or in-progress.
- The message that you selected. In order to start a new schedule, you must select a message from the screen lock page, then tap the icon to navigate to the screen lock schedule screen.
- Start a lock schedule by tapping on this icon.
- Clear any locks in progress or scheduled.
- Start a screen lock now or ahead in the future.
- Set the end time of the screen lock.
- Status message showing any locks scheduled or in-progress.
- Set lock schedule, or clear any lock schedule in-progress.
- The message that you selected. In order to start a new schedule, you must select a message from the screen lock page, then tap the icon to navigate to the screen lock schedule screen.
If your child is signed into their account and is actively using their device and connected to the internet, a lock will be re-applied as long as a scheduled lock is in progress.
Web History
The web history screen is where you can view your child's web browsing history or filter sites found in their web history.
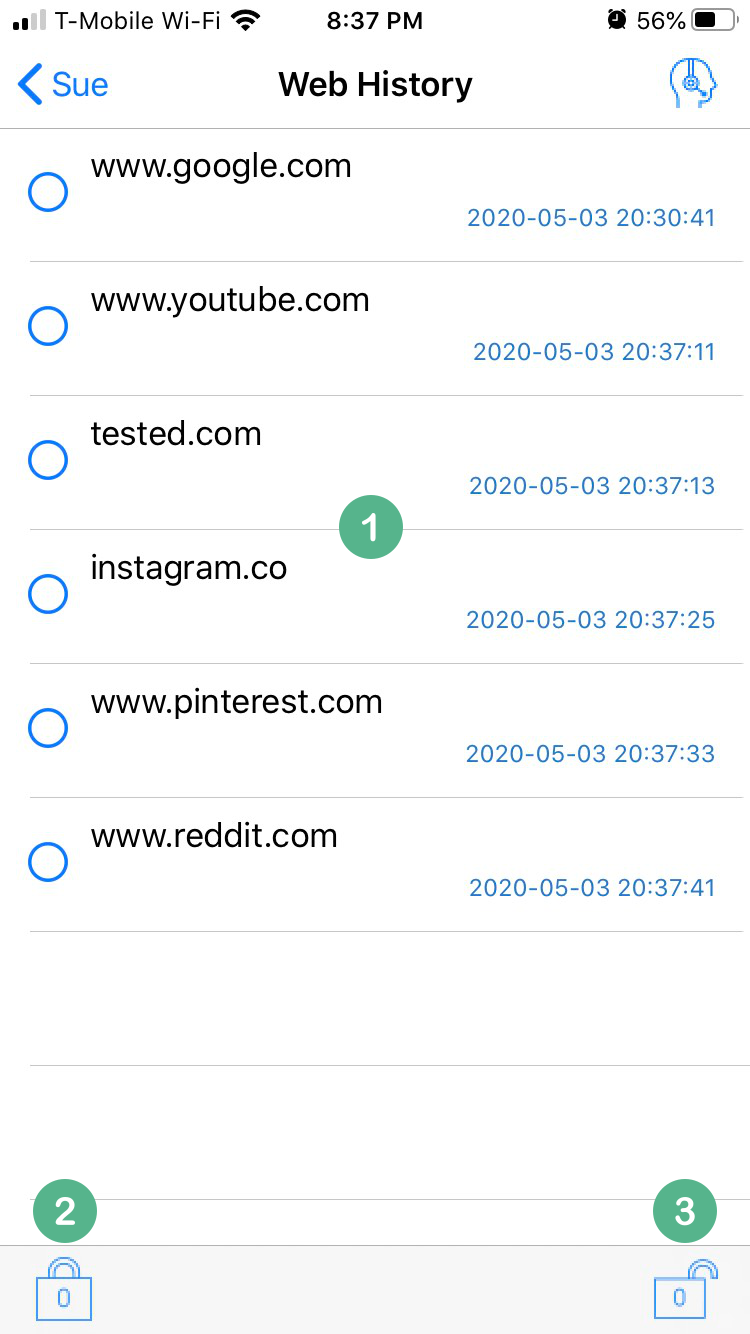
- Web history list. You can tap on an entry to visit that site.
- Filter selected sites.
- Clear all web filters activated from this screen.
How long is web history kept? What about on your servers?
Only the last 24 hours of web history is shown. We only keep the last 48 hours of web history, and any old data is deleted and replaced with new data every minute.
Why isn't the web history in chronological order
The timestamp on a web history item indicates the last time the site was accessed. E.g. if your child accessed facebook at 3:43 PM, then spotify.com at 4:00 PM, then facebook again at 4:30 PM, the facebook entry that was there previously will update its timestamp to 4:30 PM.